How to Create a Wedding Vision Board (And Actually See Your Venue Come to Life)
A wedding vision board represents one of the most practical yet underutilized frameworks in modern wedding planning. It serves as a visual anchor that transforms abstract dreams into concrete, actionable plans. For engaged couples navigating the overwhelming landscape of decisions—from color palettes to floral arrangements to lighting schemes—a curated vision board provides clarity and a powerful communication bridge to vendors. However, the traditional approach of collecting Pinterest pins and magazine clippings reveals a significant gap in the planning stack. While these boards excel at gathering inspiration, they fail to demonstrate how those abstract ideas will translate into your specific venue.
This creates a "visualization gap." You might collect images of high-ceilinged ballrooms filled with tall centerpieces, but if your booked venue has low ceilings or specific architectural constraints, your inspiration board becomes a source of friction rather than a roadmap. This is where the modern wedding tech stack evolves. Tools like VenuePreview have emerged to bridge this distance between inspiration and reality. By using AI to generate realistic transformations of your empty venue photos, you can see how our platform works to validate your design choices before spending a single dollar on décor.
This guide explores the strategic architecture of effective vision boards. We will move beyond the basics of collage-making to a systematic approach for defining your aesthetic. We will then examine how to close the loop between your vision board and your actual wedding day environment using venue-specific visualization.
What Is a Wedding Vision Board?
In simple terms, a wedding vision board is a curated collage that aggregates images, color swatches, textures, and descriptive text to communicate the aesthetic vision and emotional atmosphere of a wedding. However, viewing it merely as a collage is a mistake. It is a decision-making framework. It acts as a single reference point for the hundreds of micro-decisions that define how the wedding feels and looks.
The distinction between a random collection of images and a true vision board is intentionality. A functional vision board is edited and deliberately organized to tell a specific story about your style preferences. It filters out noise to focus on the signal of what you actually want.
Why a Wedding Vision Board Matters
The utility of a vision board extends far beyond aesthetics. It serves as a strategic tool to mitigate common planning risks:
- Prevention of Scope Creep: It prevents random, mismatched décor purchases that do not fit the cohesive narrative.
- Communication Efficiency: It makes conversations with planners, florists, and rental companies efficient by replacing vague adjectives with concrete visual references.
- Decision Fatigue Management: Research shows that couples experience substantial decision fatigue. A well-constructed board reduces cognitive burden by providing an external reference for choices.
- Comparison Buffer: It keeps you anchored when social media algorithms push trends that do not align with your established direction.
Digital vs. Physical Wedding Vision Boards
When constructing your board, you face a choice between physical and digital formats. This decision reflects fundamental differences in workflow and how you psychologically engage with the planning process.
Physical Vision Boards
Physical boards typically utilize cork, poster board, or foam core. The process involves a tactile workflow of cutting magazines, printing photos, and arranging fabric swatches. The primary advantage here is "embodied cognition." Engaging your hands in the creation process often enhances memory and genuine preference identification.
When you physically cut and paste an image, you are making a deliberate choice. This contrasts with the low-friction action of digital pinning, which often results in hoarding rather than curating. A physical board displayed in your home also serves as a persistent visual prompt. It keeps the vision present in your daily environment and combats the natural tendency toward decision-drift over a long engagement.
Digital Wedding Vision Boards
Digital boards harness the accessibility of software. Platforms like Pinterest remain dominant for initial collection, allowing for infinite discovery. However, the infinite nature of Pinterest is also its weakness. Without discipline, you accumulate thousands of pins with no coherent direction.
Tools like Canva bridge the gap by offering design flexibility. You can arrange images, overlay text, and test color palettes on a single screen. This creates a cohesive visual document rather than a scattered feed.
The limitation of all traditional digital boards is the source material. You are curating photos of other people's weddings in other people's venues. These images are often shot under specific lighting conditions or heavily edited. A stunning tablescape photographed in a historic mansion with natural light will look completely different in a windowless ballroom. This discrepancy is the root cause of "vision anxiety," a problem we solve by allowing you to upload your own venue photos to test these concepts in your actual space.
Step-by-Step: How to Create a Wedding Vision Board
To build a board that functions as a roadmap rather than just a mood board, follow this structured process.
Step 1: Define the Feeling You Want First
Do not start with images. Start with data points about the atmosphere. Before searching for a single photograph, articulate the emotional tone. Are you optimizing for an intimate, romantic atmosphere or high-energy celebration?
Consider the variables of your event:
- Season and Time of Day: A spring brunch requires a different visual strategy than a winter candlelit dinner.
- Formality Level: Black tie implies different textures and densities of décor than semi-formal.
- Lighting Conditions: Do you imagine natural daylight or manufactured mood lighting?
Alignment with your partner is critical here. If one partner envisions "minimalist modern" and the other "rustic maximalist," you have a strategic misalignment that images alone cannot fix.
Step 2: Gather Inspiration (But With Limits)
Begin the collection phase with strict constraints. Set a time box, perhaps two or three focused evenings, to avoid the trap of endless scrolling.
Focus your search on specific categories:
- Ceremony setups and backdrops.
- Table settings and centerpieces.
- Lighting configurations (chandeliers vs. string lights).
- Floral density and style.
Aim for high-fidelity inputs. The most useful images are those from real weddings that show how décor looks in standard lighting, rather than heavily filtered editorial shoots.
Step 3: Choose Your Color Palette
Your color palette is the operating system of your design. It typically consists of 3-5 main colors plus 1-2 neutrals.
In 2026, we see a divergence in trends. Traditional combinations like navy and gold remain stable, but there is a shift toward "old money aesthetic" featuring deep hunter green paired with chocolate brown. Romantic pastels like dusty rose and sage continue to perform well for garden settings.
Critical Note: Colors behave differently based on environment. A dusty rose that looks beautiful in golden-hour sun may appear muddy under indoor tungsten lighting. You need to validate these colors against your venue's reality.
Step 4: Curate, Don't Hoard
This is the most important step. You must ruthlessly edit. Planners recommend reducing your initial collection by at least 50%.
Review every image and ask:
- Does this align with the color palette defined in Step 3?
- Is this a trend I like on Instagram, or a genuine preference for my wedding?
- Does this fit the architectural constraints of my booked venue?
Clarity beats quantity. A board with 15 cohesive images is infinitely more valuable to a vendor than a board with 100 contradictory ones.
Step 5: Build Your Actual Vision Board Layout
Whether physical or digital, organize the final output by category or flow. Group ceremony elements together and reception details together. Add text labels to explain why an image is there. A note saying "Love the height of these flowers, but prefer white over pink" gives your vendor precise instructions that an image alone cannot convey.
Turning a Generic Wedding Vision Board Into a Venue-Specific Plan
We must address the friction point mentioned earlier: the gap between generic inspiration and venue specific reality.
Why Your Venue Changes Everything
Every venue has a hardware configuration that dictates what software (décor) will run effectively on it.
- Ceiling Height: This determines whether tall floral installations create elegance or claustrophobia.
- Window Placement: This dictates the viability of natural light photography and how colors render.
- Flooring and Wall Color: Existing carpets or wallpapers are immutable facts. Your vision board must harmonize with them, not fight them.
If you ignore these constraints, you risk "vision anxiety." This is the stress of not knowing if your plan will actually work until the day of the event. To mitigate this risk, you need to transition from abstract planning to concrete venue visualization.
How to See Your Wedding Vision in Your Real Venue (Using VenuePreview)
VenuePreview is designed to be the next-level iteration of the vision board. It is not just about gathering ideas; it is about stress-testing them in your actual environment.
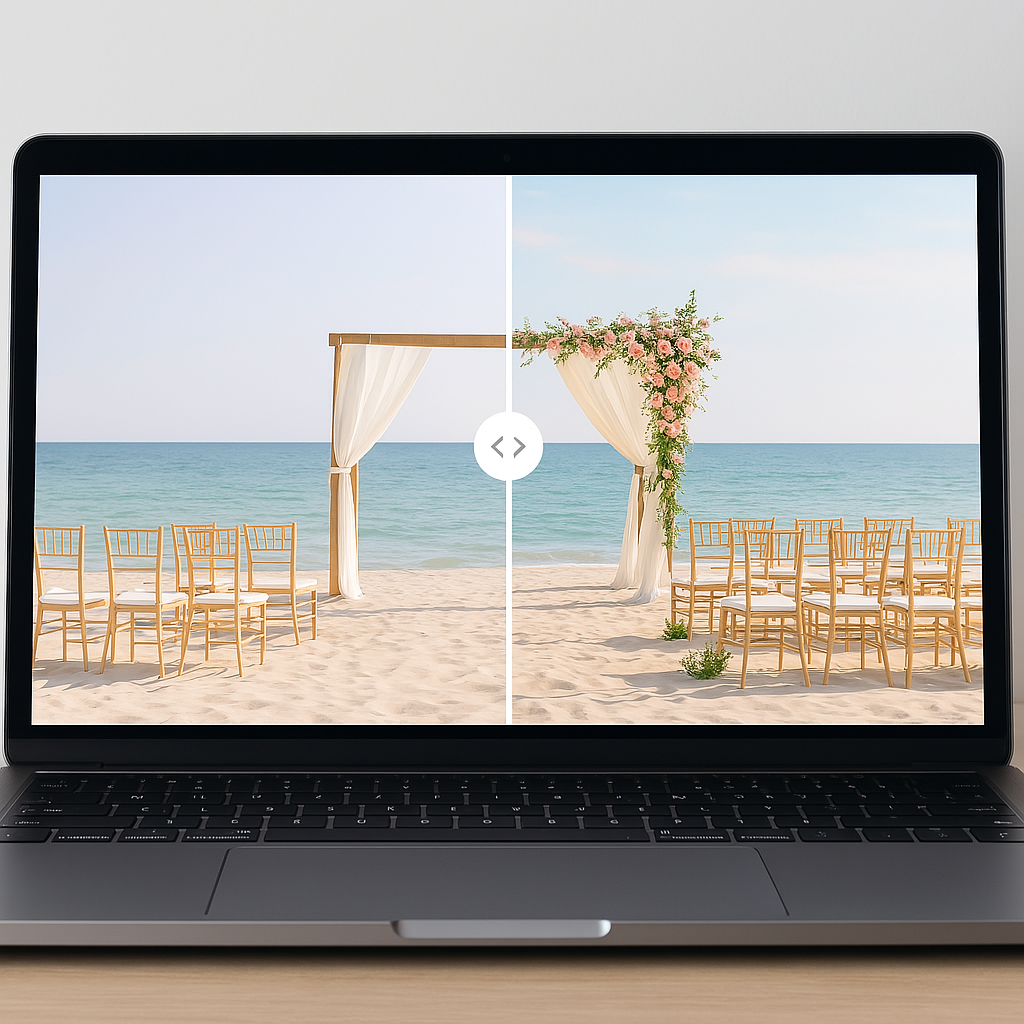
What VenuePreview Does
The platform allows you to upload photos of your empty or undecorated venue. You then select from various style templates—such as romantic, modern, or rustic—and input your specific color palette. The system uses advanced AI to generate photorealistic visualizations of your venue fully decorated.
The output is substantial. Even at the entry level, the system generates 40 unique venue visualizations with multiple style variations. For couples who need deep exploration, higher tiers offer up to 200 visualizations across 10 different style variations. This volume of data allows you to explore the full probability space of your design choices.
How to Use Your Vision Board With VenuePreview
- Input Your Baseline: Take the style and colors from your curated vision board.
- Upload Context: Upload wide shots of your reception room and ceremony area.
- Generate Scenarios: Select the styles that match your board. If your board is "Modern Minimal," select that template.
- Analyze the Output: The AI applies your chosen aesthetic to your specific architecture. You can now see if "Modern Minimal" makes your large ballroom look elegant or empty.
- Iterate: If the first batch reveals that your color palette clashes with the venue's carpet, adjust the inputs and regenerate.
This process transforms VenuePreview into a dynamic, venue-specific vision board. It provides a feedback loop that static images cannot offer.
Using Your Wedding Vision Board With Vendors
Once you have your foundational vision board and your VenuePreview visualizations, you have a complete communication package for your vendors.
With Planners & Coordinators
Planners operate as the project managers of your wedding. Show them both your mood board and your venue visualizations. This allows them to see the layout density you prefer. They can immediately flag operational issues, such as whether a specific table layout blocks service paths, based on the realistic rendering of the space.
With Florists & Décor Vendors
Florists suffer from the "curse of knowledge"—their mental image of "garden style" may differ from yours. By showing them specific tabletops generated in VenuePreview, you provide an exact target. You can ask data-driven questions: "What would a centerpiece of this scale cost?" or "Can we achieve this visual density with seasonal flowers to optimize the budget?"
With Venue Managers
Venue managers are concerned with logistics and policy. Use your visualizations to discuss placement. If your visualization shows candles on the floor, the manager can immediately inform you if that violates fire codes. Catching this during the planning phase is zero-cost; catching it on the wedding day is a crisis.
Tips to Keep Your Wedding Vision Board Realistic and Stress-Free
To ensure your vision board serves you rather than stresses you, adhere to these principles.
- Align with Budget Realities: Data from 2026 indicates that 60% of couples report budget stress is their primary planning pain point. Often, this stress is self-inflicted by falling in love with inspiration images that are outside financial reach. Use your board to find the feeling, then ask vendors how to execute that feeling within your specific budget cap.
- Respect Venue Policies: Confirm rules regarding open flames, hanging installations, and adhesives. Use your visualizations to propose compliant alternatives, such as LED candles or freestanding structures.
- Prioritize Guest Experience: Ensure your aesthetic does not compromise usability. Visualizations help you check if centerpieces block sightlines or if aisles are too narrow for comfortable movement.
- Lock It Down: Limit revisions. Decide on a "lock-in" date, perhaps 3-4 months prior to the event. After this date, the vision board is read-only. Constant tweaking leads to decision fatigue and increased costs.
When to Start Your Wedding Vision Board (and Venue Visualization)
Timing is a leverage point. The ideal window to start your vision board is 9-12 months before the wedding, concurrent with venue selection.
If you have not yet booked a venue, you can use VenuePreview as a selection tool. Upload photos from tours of your top three choices and apply the same style to all of them. This allows for an apples-to-apples comparison of how each venue handles your vision.
For couples on a compressed timeline (3-6 months), the process must be accelerated. Spend less time on broad inspiration gathering and move quickly to venue-specific visualization. This reduces the cycle time between idea and execution, which is critical when vendor availability is closing.
Building Your Modern Wedding Toolkit
The wedding vision board is your strategic foundation. It clarifies your aesthetic, aligns your stakeholders, and filters out the noise of the wedding industry. But in 2026, a static board is no longer the limit of what is possible.
The real confidence in planning comes when you close the loop between expectation and reality. By validating your vision board against the physical truth of your venue, you eliminate variables and reduce the anxiety of the unknown. You move from hoping it looks good to knowing it fits.
Once you have defined your style, take the definitive step to visualize it. Upload your venue photos and let the data guide your design. This is how you turn a mood board into a rigorous, executable plan that ensures your wedding day looks exactly as you envisioned.
Ready to Visualize Your Wedding Venue?
See exactly how your venue will look on your wedding day with AI-powered visualizations. Get started in minutes with packages starting at just $19.